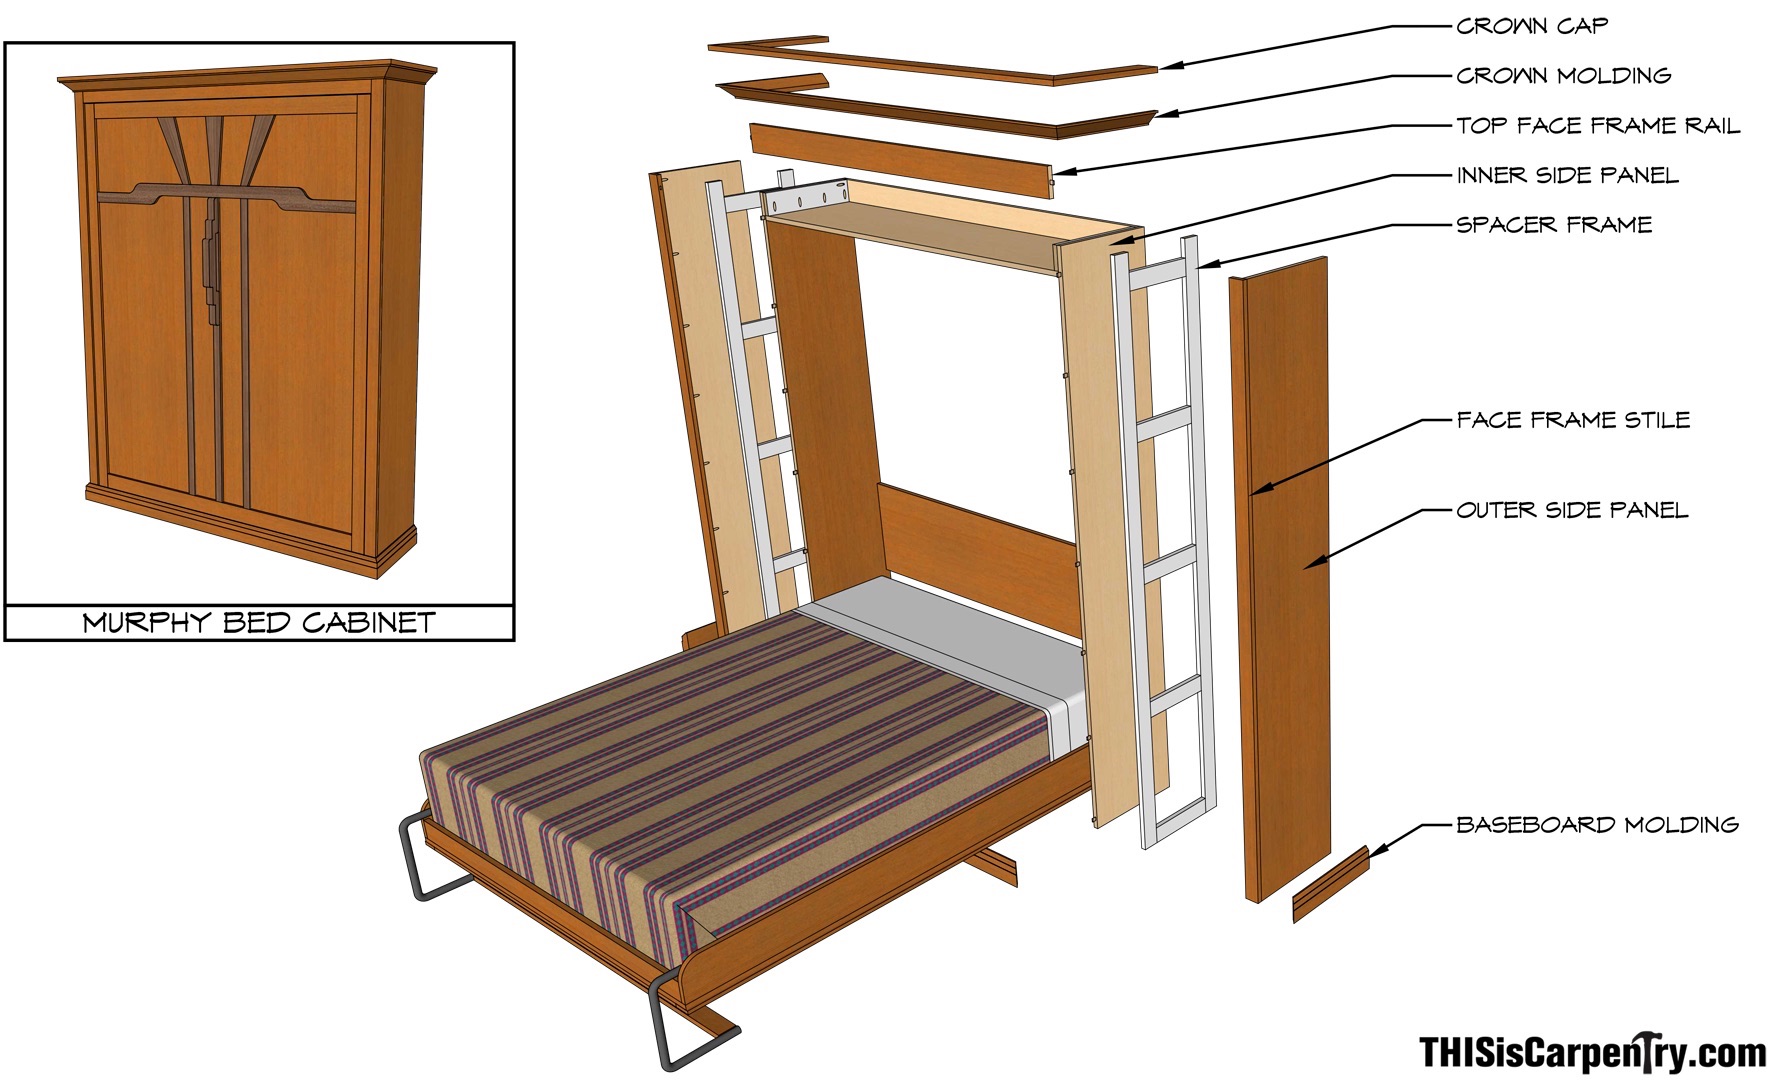
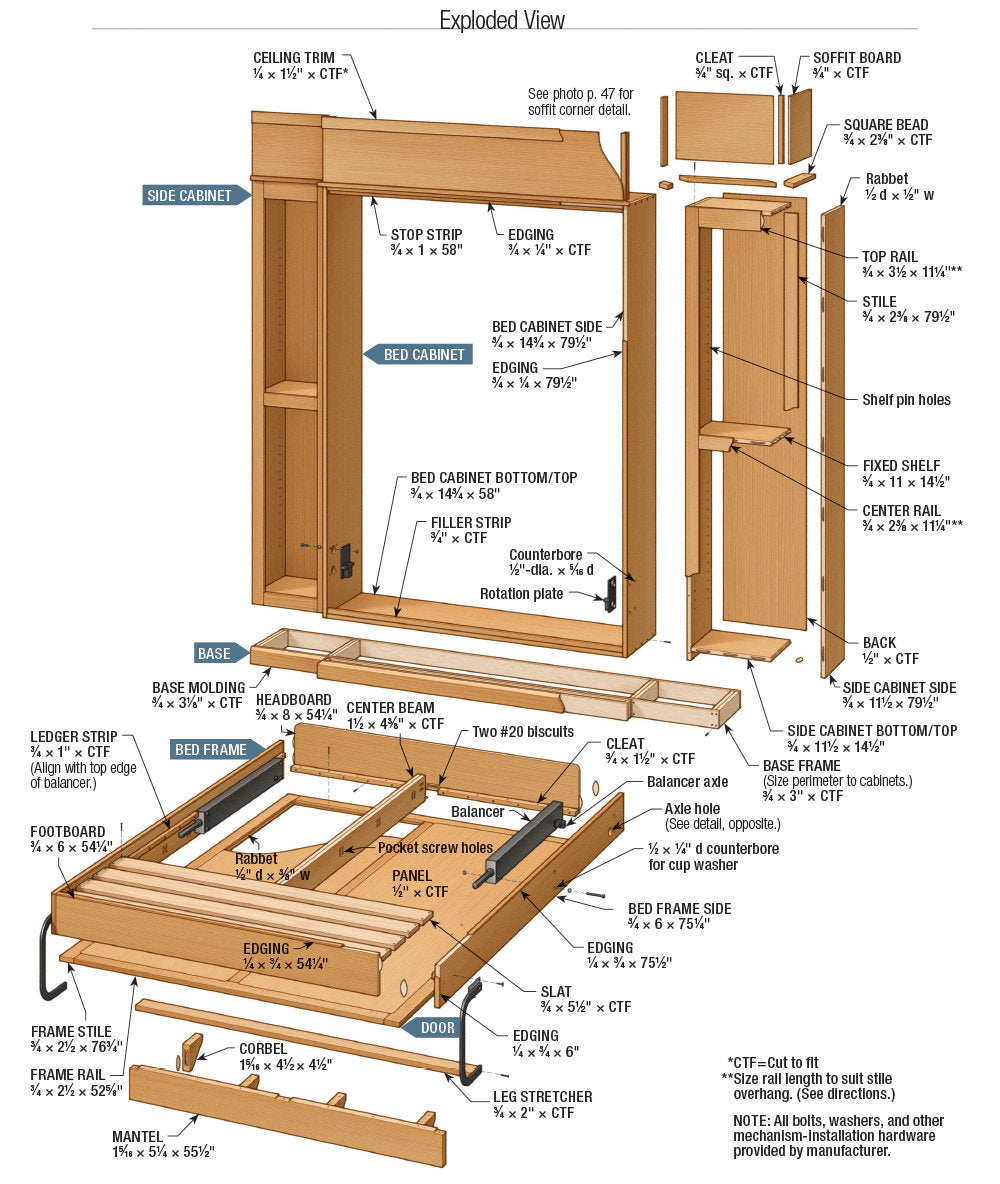
You’re about to learn some valuable tips on installing a Murphy bed from the experts at Woodworkers Journal. In this video, Rob Johnstone demonstrates how to use Rockler’s new hardware to build and install a Murphy bed frame. By following these tips, you’ll be able to complete the installation process with ease and efficiency. From attaching the frame to the mounting plates to securing the front panel using black clips, you’ll get a step-by-step guide on how to make the installation process smoother.
As Rob Johnstone explains the intricacies of the installation process, you’ll understand the importance of secure attachment to the wall and stud. The strength of the hydraulic struts and the flexibility of the slats are key components in ensuring the stability of the Murphy bed. By following the tips provided in this video, you’ll be able to build and install your own Murphy bed with confidence and precision.
Tip 1: Bed Frame Installation
When installing a Murphy bed, one essential step is to ensure the flexibility of the slats in the bed frame. These slats play a crucial role in supporting the weight of the mattress and providing a comfortable sleeping surface. Make sure the slats are properly installed and secured to maintain stability.
Attaching the bed frame to the mounting plates is another important aspect of the installation process. These mounting plates serve as the connection point between the frame and the wall, providing structural support for the bed. Securely fasten the frame to the mounting plates to ensure safety and stability.
Connecting the bed frame to hydraulic struts is a key step in making the Murphy bed functional. The hydraulic struts help in lifting and lowering the bed with ease. Make sure to attach the struts securely to the frame to prevent any issues with the lifting mechanism.
Attaching the front panel to the bed frame is the final step in completing the installation process. Use black clips for attachment, following the manufacturer’s instructions carefully. It is advisable to have two people work together when attaching larger panels to ensure proper alignment and secure attachment.
Tip 2: Using Hydraulic Struts
When using hydraulic struts in a Murphy bed, it is important to know how to remove and replace cleats. Cleats are crucial components that allow the bed frame to swing past 90° when opening and closing the bed. Understand the functionality of cleats to ensure smooth operation of the bed mechanism.
Utilize strong hydraulic struts to support the weight of the mattress effectively. These struts need to be sturdy enough to withstand the pressure exerted by the mattress when the bed is in use. Proper installation and maintenance of hydraulic struts are essential for the longevity and functionality of the Murphy bed.

Tip 3: Attaching Front Panel
To attach the front panel to the Murphy bed, use black clips for secure attachment. These clips are specifically designed for hanging the panel on the assembled frame. Ensure that the clips are correctly positioned and attached to prevent any issues with the front panel.
When dealing with larger panels, it is recommended to use a two-person method for attachment. This will make the installation process smoother and reduce the risk of damaging the panel. Working with a partner can also help with adjusting the alignment of the panel to the opening properly.
Adjust the alignment of the front panel with the clips to ensure a perfect fit. Proper alignment is essential for the smooth operation of the bed when opening and closing. Take your time to adjust the clips and ensure that the panel is securely attached to the frame.
Tip 4: Wall Attachment
When securing the Murphy bed to the wall, it is important to attach it to wall studs for maximum support. Avoid relying solely on sheetrock for support, as it may not be able to withstand the weight of the bed. Locate and secure the bed to wall studs to ensure stability and safety.

Tip 5: Safety Precautions
Ensuring proper installation of the Murphy bed is essential for safety. Follow the manufacturer’s instructions carefully to avoid any mishaps during the installation process. Check all connections and fastenings to ensure that the bed is secure and stable for use.
Tip 6: Tools Required
Before starting the installation process, make sure you have all the essential tools needed for assembly. Common tools required for installing a Murphy bed include screwdrivers, drills, wrenches, and measuring tape. Avoid common mistakes such as using the wrong tools or incorrect measurements during assembly.

Tip 7: Maintenance and Care
To maintain the functionality of the Murphy bed, regularly clean and maintain the hardware components. Check for loose screws and fittings and tighten them as needed. Proper maintenance will extend the lifespan of the bed and ensure smooth operation.
Tip 8: Troubleshooting Common Issues
If you encounter alignment problems with the Murphy bed, follow these tips to fix them. Adjust the clips and attachments to ensure proper alignment of the bed frame and panels. In case of hydraulic strut malfunctions, seek professional help to diagnose and repair the issue.

Tip 9: Customization Options
Explore different customization options for your Murphy bed, such as adding shelves or storage compartments. Enhance the functionality of the bed by incorporating additional features that suit your needs. Consider painting or staining the bed frame for a personalized touch that complements your decor.
Tip 10: Expert Recommendations
Seek professional help for installation if you are unsure about the process. Experienced woodworkers can provide valuable tips and advice for successful Murphy bed projects. Consult with experts in the field to ensure a smooth and efficient installation process.
By following these Murphy bed installation tips, you can build and install a functional and stylish bed that maximizes space in your home. Whether you are a DIY enthusiast or looking to enhance your woodworking skills, these tips will help you achieve a successful Murphy bed project. Remember to prioritize safety, proper installation, and maintenance to enjoy your Murphy bed for years to come!
